How to Animate a Static Image on a Figure-Eight Path
A step-by-step guide to animating a flat PNG in SVGA DIY: stack Float and Sway at a 2:1 timing ratio so the artwork travels a figure-eight path, then add a Sweep highlight.
Most SVGA DIY tutorials start from an existing .svga file and change
something inside it. This one starts from nothing at all: a blank canvas and
a single flat PNG. That's the situation you're in when a designer hands you a
gift illustration and someone asks for "the animated version" — no source
animation, just a picture.
The goal here isn't just "make it move". It's a specific, very reusable motion: the artwork travels a figure-eight path, drifting up and down while swinging side to side, so it traces out a digit 8 over one loop. It's the motion that makes a floating gift feel alive rather than mechanical, and it comes out of two ordinary effects combined at the right timing ratio.
Three effects do all the work:
- Float — vertical travel, the up-and-down component.
- Sway — a rocking rotation around the layer's bottom edge, which swings the body of the artwork left and right. This is the horizontal component.
- Sweep — a highlight band that travels across the artwork, the classic "shine" pass you see on gift icons and logos.
The demo image
This walkthrough uses a rose-gold heart-gemstone ring — the kind of item that shows up as a premium gift in a social voice-chat app. It's a plain PNG with a transparent background:
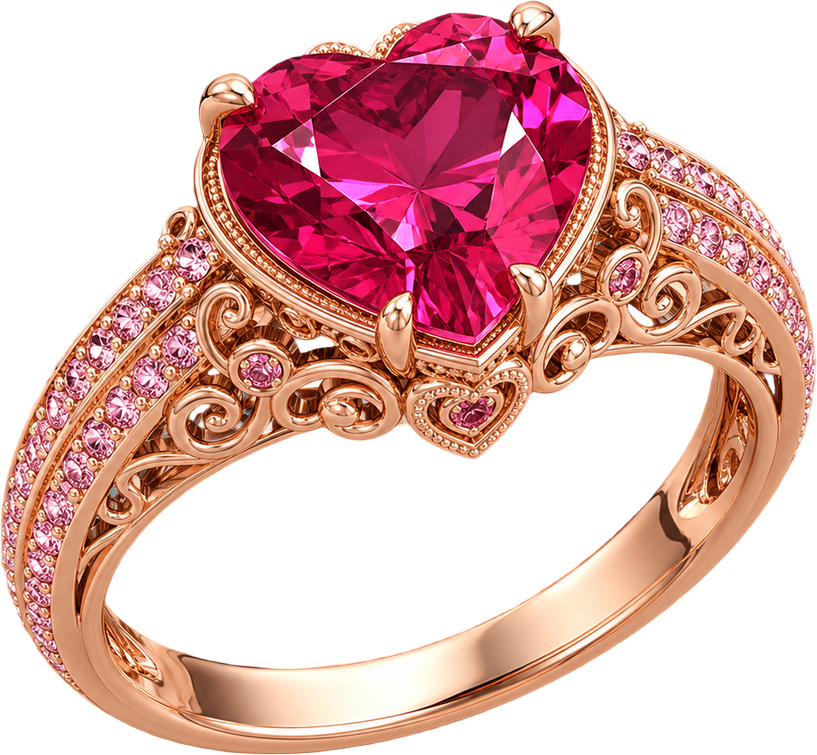
You can download the ring PNG and follow along with exactly the same file, or substitute your own artwork. Two things matter about whatever image you use: it should have a transparent background (a cut-out, not a photo on a white rectangle), and it should be trimmed to its content — no wide empty margins baked into the file, since those quietly become part of the layer and affect where the Sweep highlight travels.
Step 1: Create a blank SVGA
Open the editor. With no document loaded, the Preview panel offers two ways in — New SVGA and Open SVGA. Click New SVGA.
The dialog asks for a document name, a canvas size, a frame rate and a frame count. Pick the 750 × 750 preset — a common size for gift animations — and leave the defaults of 20 fps and 60 frames, which gives a clean three-second loop. Click Create.
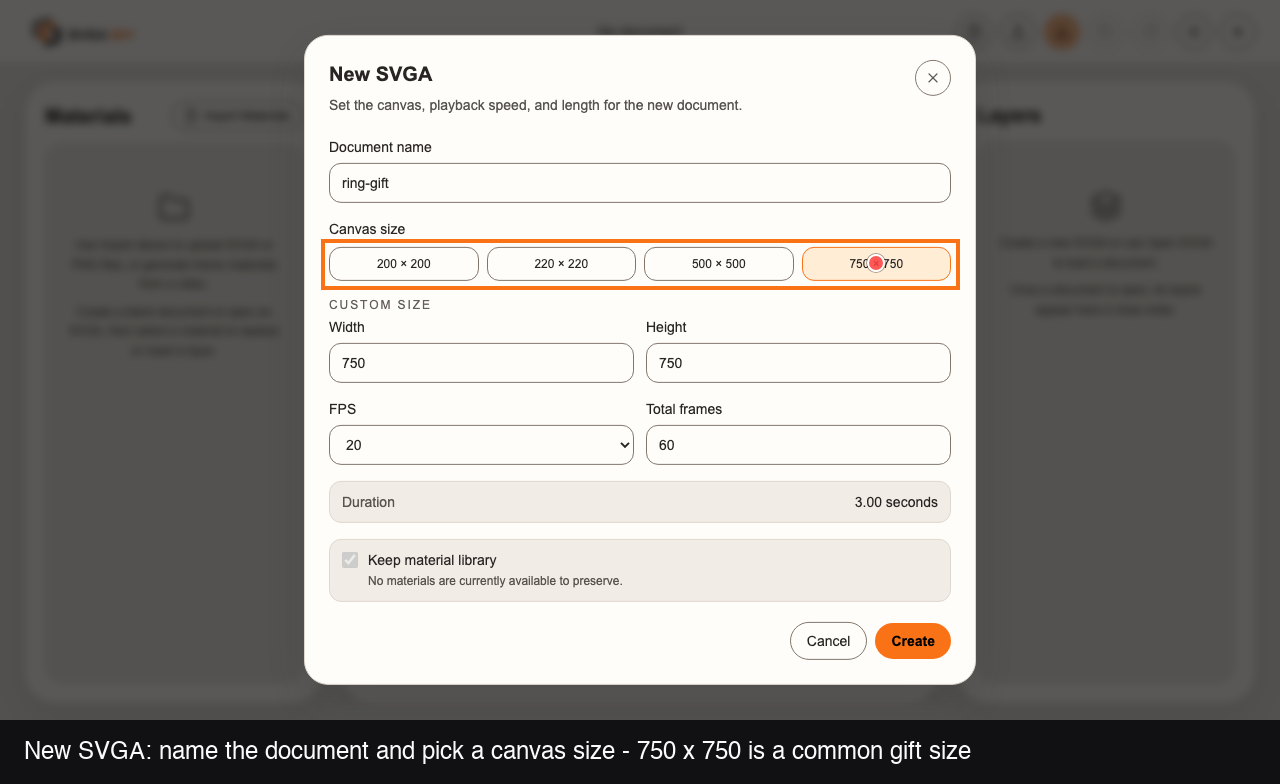
The 60-frame length matters later: both motion effects have to divide into it evenly for the figure eight to close cleanly.
Step 2: Switch to Dark mode
Click the theme toggle in the topbar and choose Dark.
This isn't just taste. The Sweep highlight you'll add later is a bright, warm band, and it barely registers against the light theme's pale canvas background. On the dark checkerboard it reads immediately — and dark is closer to the app backgrounds these gifts actually play over.
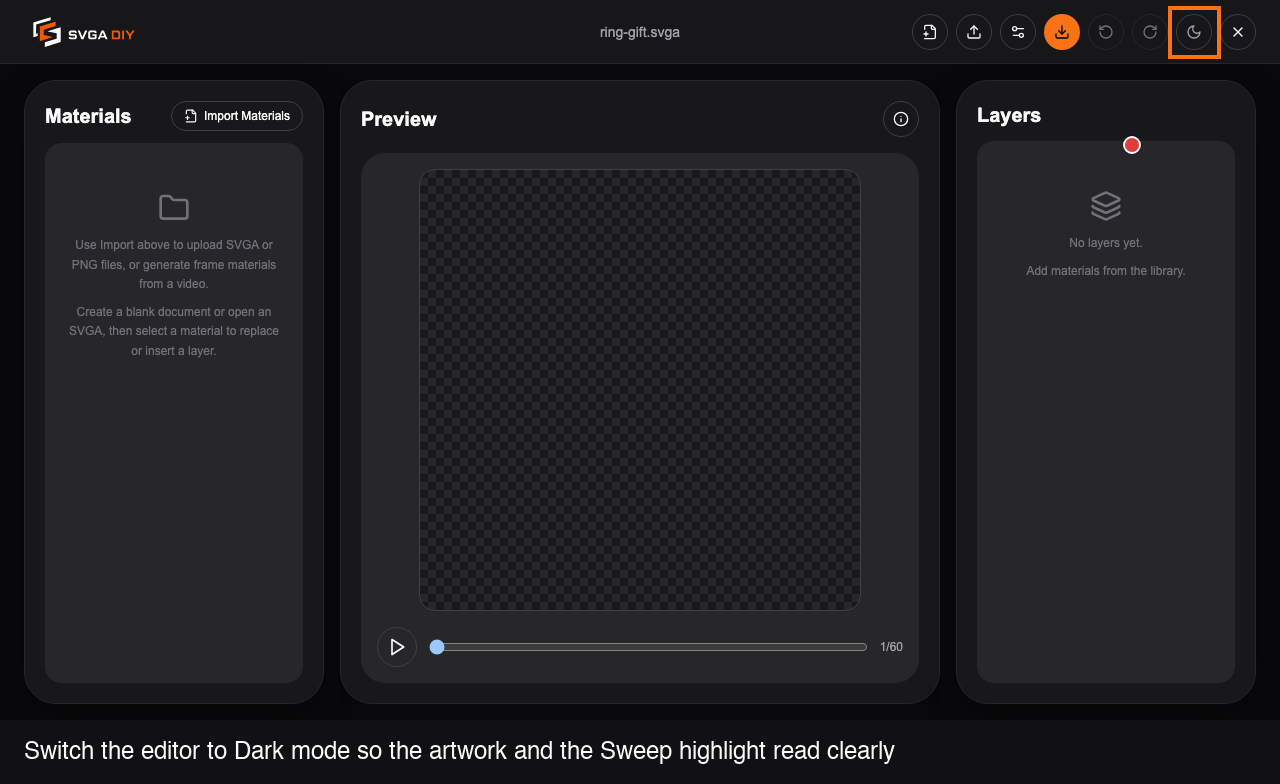
Step 3: Import the PNG
The topbar's Open SVGA button only accepts .svga files, so a PNG comes
in a different way: click Import Materials, stay on the Local assets
tab, and use the Import PNG files picker on the right.
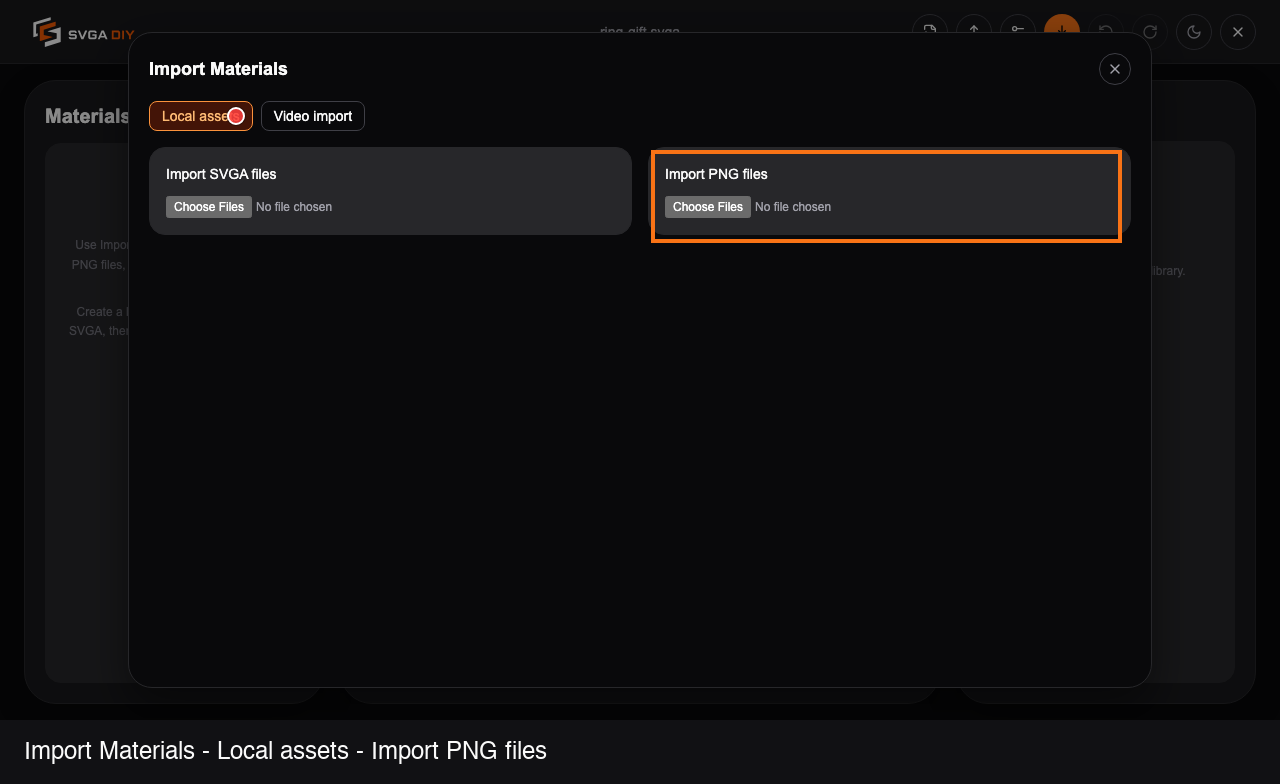
The image lands in the Materials panel on the left as ring.png. It's now in
the document's material library, but it isn't on the canvas yet.
Step 4: Add it to the canvas
On the material's row, click Add to layers. The ring appears on the canvas and a matching ring layer shows up in the Layers panel.
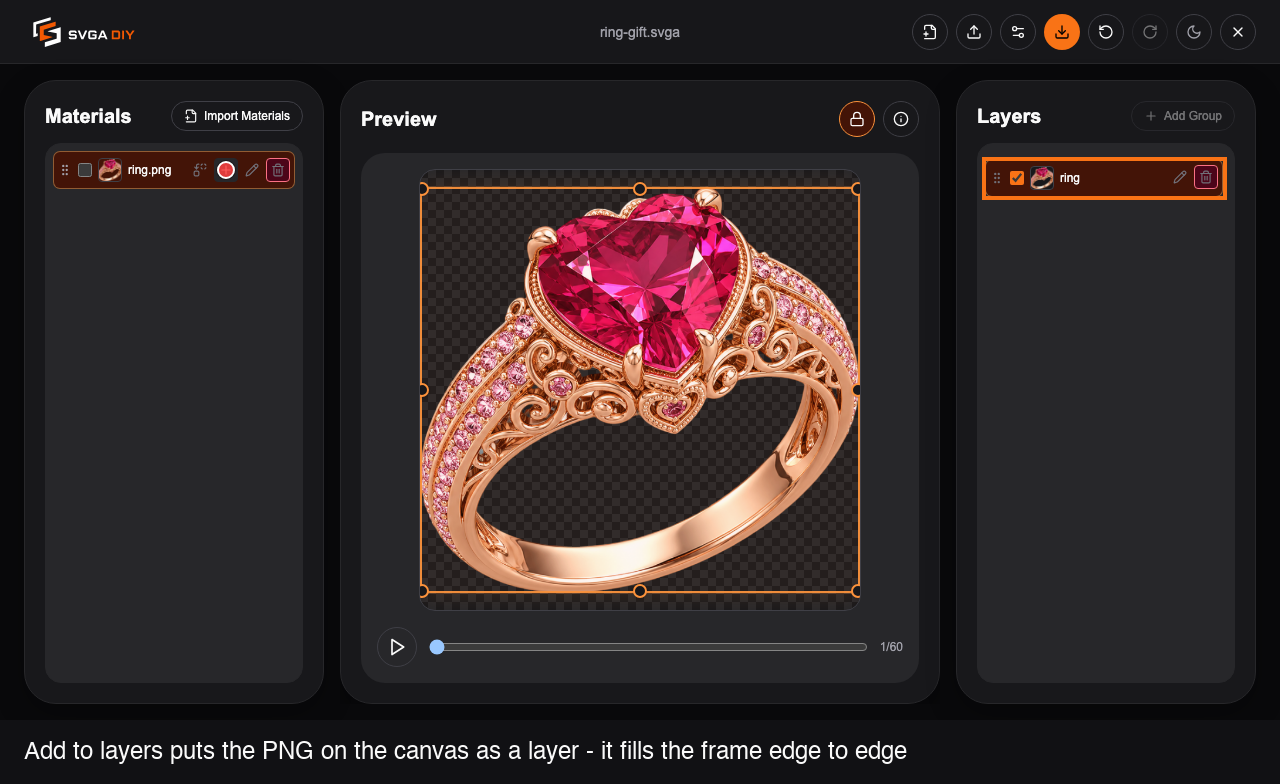
Notice that the image arrives scaled to fill the canvas edge to edge. That matters for the next step.
Step 5: Scale the layer down
Click the edit (pencil) icon on the ring layer to open its properties, then drag Scale X and Scale Y down to 0.8.
This is the step people skip, and it's the reason their first attempt looks broken. The canvas is a hard boundary. At scale 1.0 the ring touches all four edges, so every bob clips the top or bottom and every swing shaves off a corner — you'd never see a figure eight, just a rectangle of artwork sliding under a mask. Scaling to 0.8 leaves roughly 75 pixels of margin on each side, which is more than the motion below ever uses.
The preview updates as you drag, so you can see the margin appear in real time:
Step 6: Add Float for the vertical motion
Scroll down the property page and click Effects, then Add effect. The catalog has two sections: Basic loop (Float, Sway, Breathe, Spin, Opacity pulse) and Light Effects (Sweep, Glow).
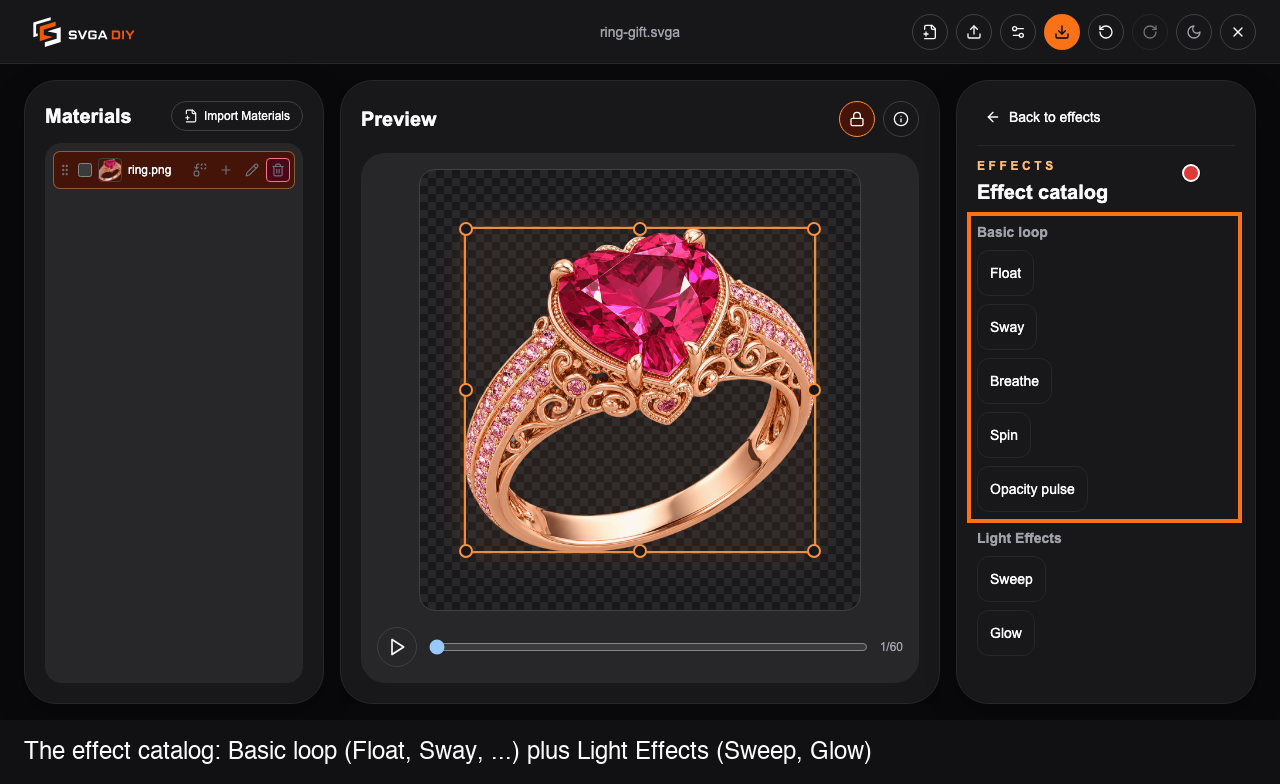
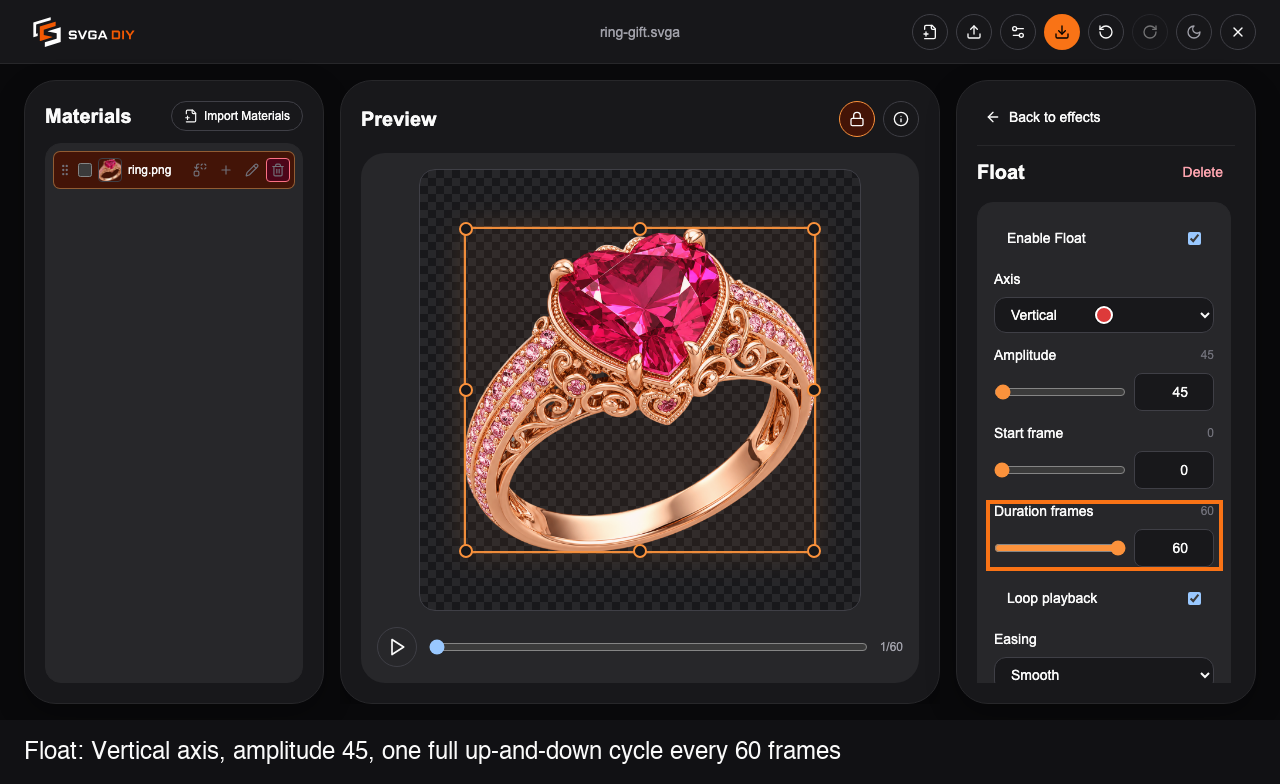
Choose Float. It arrives with its axis already set to Vertical, which is what we want. Change two numbers:
- Amplitude → 45. The default 12 is a subtle drift; 45 pixels makes the vertical travel of the eight clearly visible.
- Duration frames → 60. This is one complete up-and-down cycle per document loop.
Step 7: Play it with Float alone
Press Play now, before adding anything else. What you get is a plain vertical bob — the ring rises and falls in a straight line:
Worth watching, because the next step is what turns this straight line into a figure eight.
Step 8: Add Sway at half the duration
Go Back to effects, click Add effect again, and pick Sway. Set:
- Angle → 5 degrees.
- Duration frames → 30.
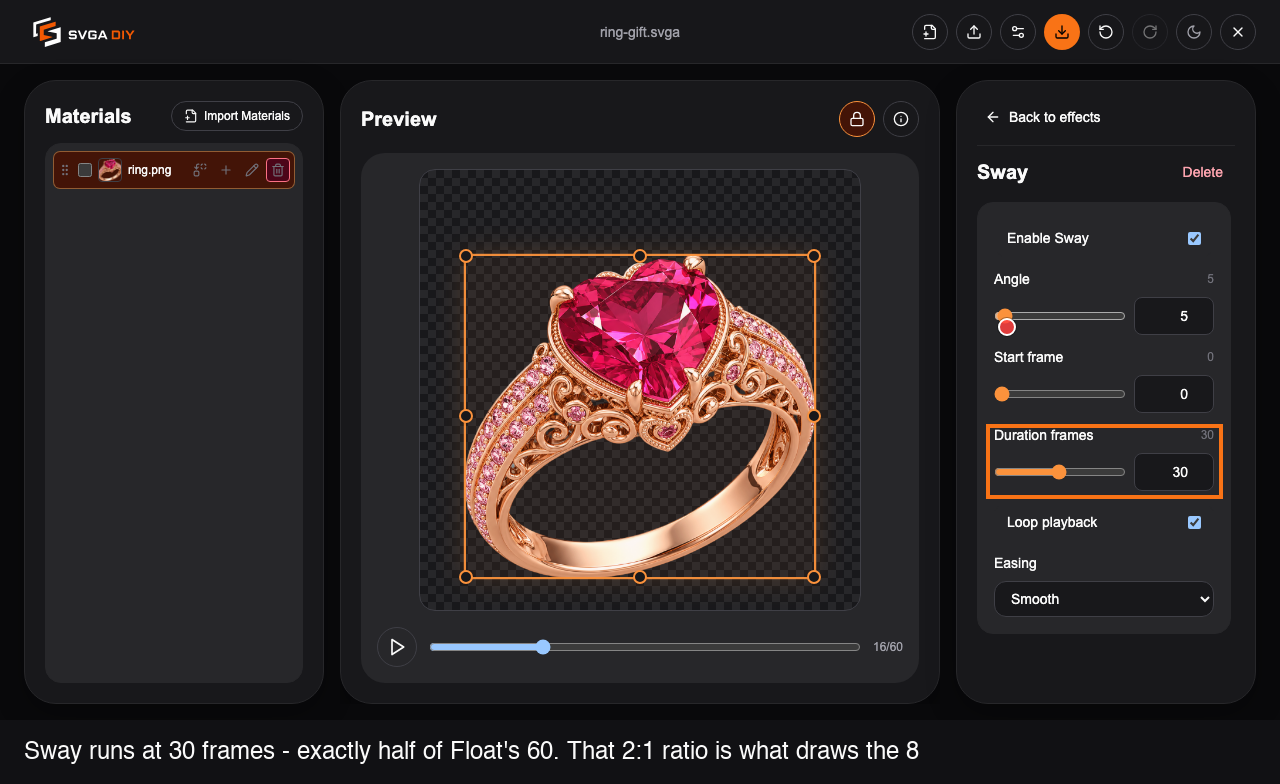
That 30 is the whole trick. Sway rotates the layer around its bottom edge, so the body of the ring swings left and right — that's your horizontal motion. Combine a horizontal oscillation with a vertical one and the shape you get depends entirely on their frequency ratio:
- Equal durations (60 and 60) — the two motions stay in step and the artwork just slides along a diagonal line or an ellipse.
- Horizontal at twice the speed (30 against 60) — the artwork completes a full left-right swing during the upward half of the bob and another during the downward half. Two loops stacked vertically: a figure eight.
It's the same math as a Lissajous curve, and 2:1 is the ratio that draws an 8. Both numbers also divide the 60-frame document evenly, so the path closes seamlessly instead of jumping at the loop point.
Step 9: Play the figure eight
Press Play again. The straight bob from step 7 is now a figure-eight path — the ring rises while swinging one way, crosses back through the middle, and falls while swinging the other:
If you want a wider or narrower 8, adjust the two amplitudes rather than the durations: Float's amplitude controls the height of the eight, Sway's angle its width. Change either duration and you'll lose the shape.
Step 10: Add a Sweep effect
Once more: Back to effects → Add effect → this time Sweep, from the Light Effects section.
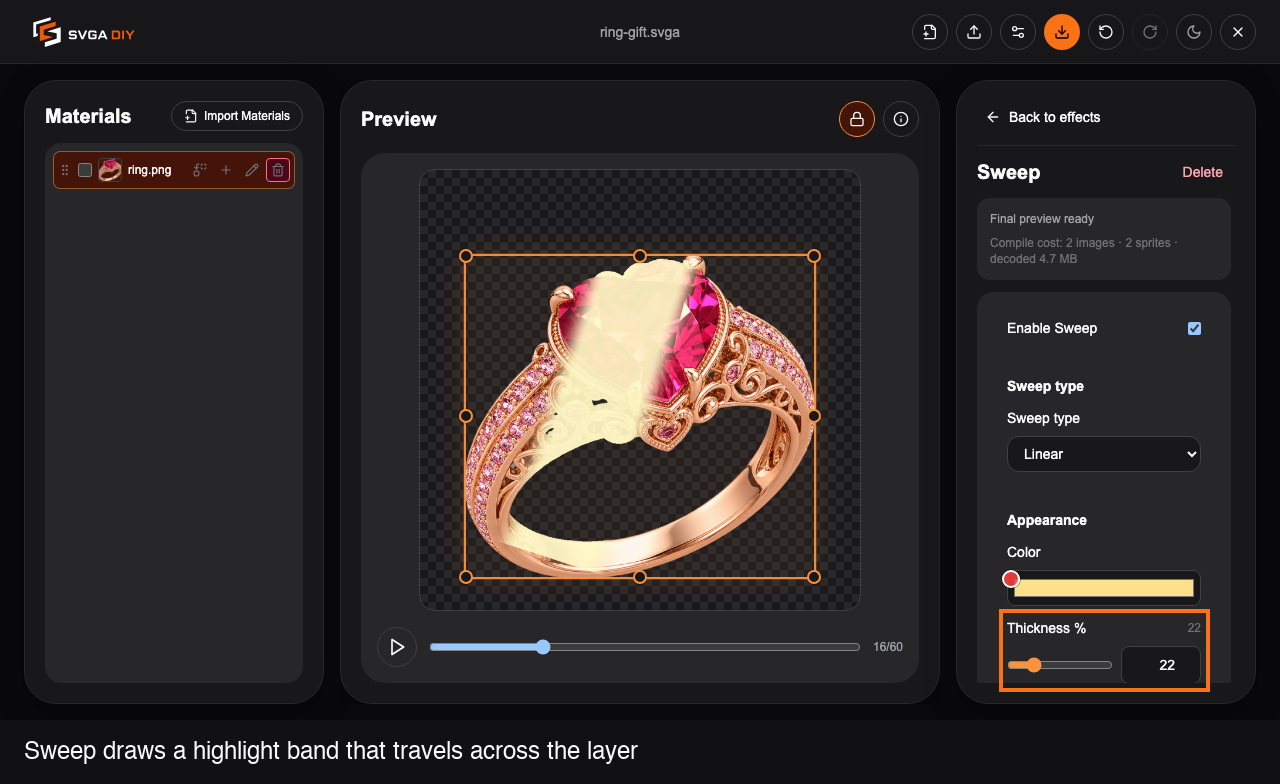
Sweep works differently from the first two. Float and Sway move the layer around; Sweep paints onto it, drawing a bright band that travels across the layer's own pixels. That's why it needs a reasonably large, reasonably bright subject to be worth doing — on a big rose-gold ring it reads as a gleam crossing the metal.
Step 11: Tune the Sweep
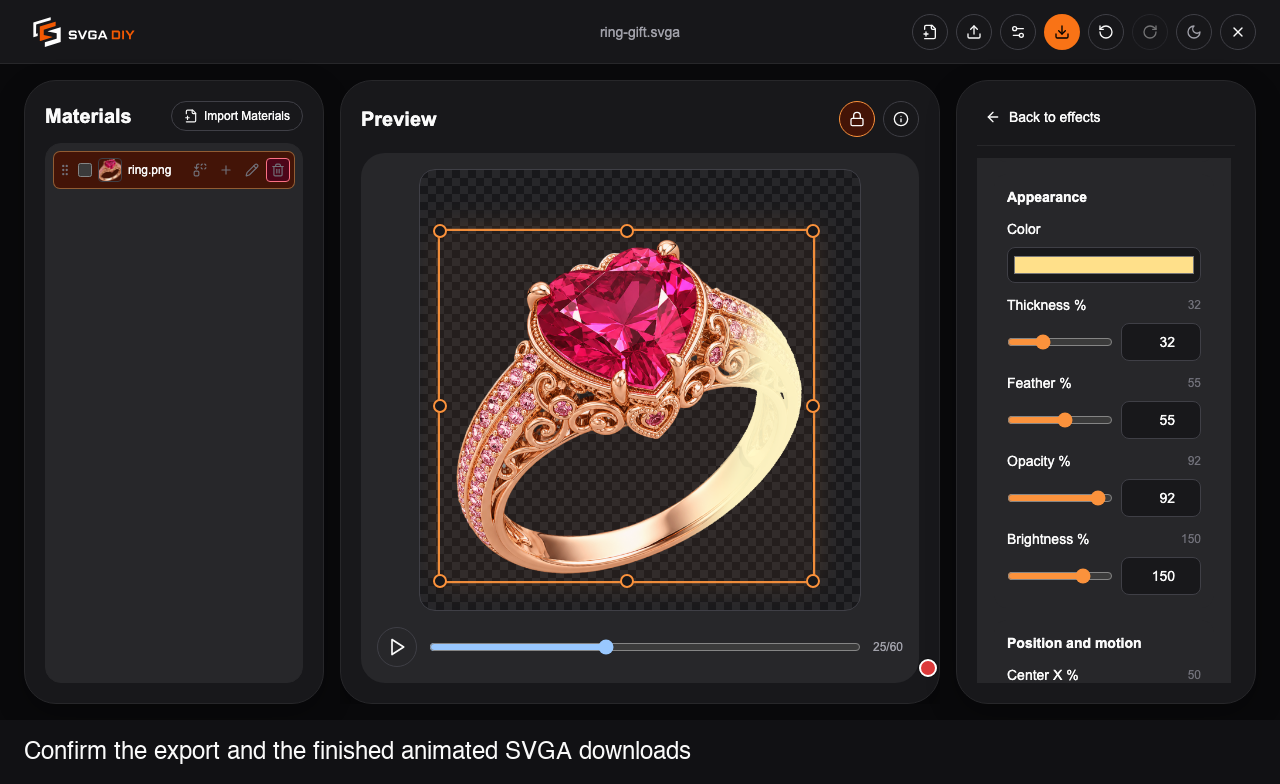
Park the preview on a frame where the highlight is actually crossing the artwork — for this document, somewhere around frame 22 — then drag Thickness % up to about 32 and Feather % up to about 55. The band widens and its edges soften, live, as you drag:
One parameter to be careful with: Brightness %. Pushing it well past its default washes the highlight out into a flat white shape and takes the ring's pavé stones and filigree with it. If the gleam is reading as a white blob rather than a reflection, brightness is usually the culprit — widen and soften the band instead.
Step 12: Play the finished loop
Press Play one last time. All three effects run together: the ring travels its figure eight while a highlight sweeps across it once per loop.
Step 13: Review the export check
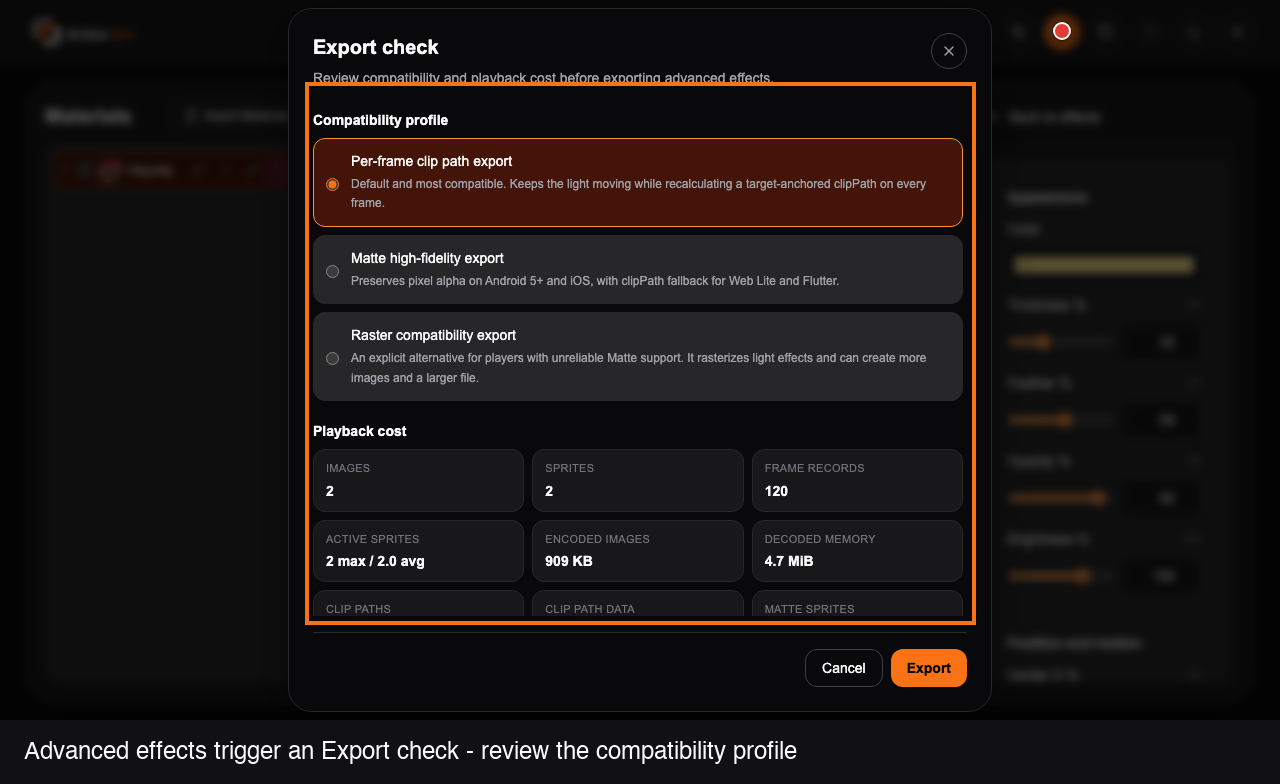
Click Export in the topbar. Because the document now contains an advanced effect (Sweep is a Light Effect), SVGA DIY shows an Export check dialog first, rather than exporting immediately. It lists three compatibility profiles and a playback cost summary.
The default, Per-frame clip path export, is the most compatible option and is pre-selected. If your target player is old or unusually strict, the other two profiles trade file size or fidelity for broader support.
Step 14: Export the file
Click Export inside the dialog to confirm. The finished .svga downloads
— a static PNG turned into a looping gift animation, without drawing a single
frame by hand.
Where to go next
The figure-eight recipe works on any cut-out artwork, and the same frequency-ratio thinking opens up other paths:
- 3:1 instead of 2:1 (Sway at 20 frames against Float's 60) gives a tighter, more restless weave.
- Swap Float for Breathe (a scale pulse) if the object should feel like it's throbbing rather than travelling.
- Add Glow next to Sweep for a softer, all-over light instead of a travelling band.
- Give each effect a Start frame offset so they don't all restart on the same frame, which makes a short loop feel less repetitive.